Lab 00 – Beginnings
This week’s lab guides you through all the required steps for registering for your course accounts and getting your user environment properly set up for the rest of the semester.
This lab is not really a true lab, instead it’s all the preliminary steps you’ll need to follow to get set up for the rest of the semester. The main tasks you’ll be completing are as follows:
-
Fill out and submit your FERPA Release Form for Email Addresses on Blackboard
-
Accept the Slack workspace invitation by registering for your account
-
Create a GitHub account and accept the invitation to join the GitHub course organization
-
Login to RStudio Server after you receive your temporary password and do the following:
FERPA Release Form for Email Addresses
According to recent changes in Virginia state law regarding the Family Educational Rights and Privacy Act (FERPA), student email addresses are now classified as protected information. This change extends to the sending of third-party registration invitations to student emails for GitHub and Slack, two platforms that we will be using during the semester. A waiver is posted on Blackboard so that you can grant limited permission to the course instructor to send you these invitations. Your email address will only be used for the purpose of sending these account invitations and the waiver is only valid for the semester and section of CDS 101 or CDS 102 listed on the form.
To give your formal consent for using your email address to send invitations to create accounts on the platforms used during CDS 101 and CDS 102, print the form out, fill in your information, sign and date it, then take a picture of it and upload it to Blackboard. The Office Lens app on the iTunes App Store, https://itunes.apple.com/us/app/office-lens/id975925059?mt=8, and the Google Play App Store, https://play.google.com/store/apps/details?id=com.microsoft.office.officelens&hl=en_US, is very handy for scanning these types of documents using your smartphone camera. You can also digitally sign it if you prefer. If you have questions or concerns about signing the form, please get in contact with your course instructor.
Preferred email to use for account creation
After you have filled out and uploaded the FERPA Release Form, the next thing you should do is fill out the Google Form asking you what email address you want the course instructor to use when sending you account registration invitations on third-party services. The link to the form can be found on Blackboard under the Course Sites link on the left sidebar. The email address you provide can be your school email address, a Gmail account, or whatever else you’d like us to use.
Account registrations
Sometime after you’ve submitted your FERPA Release Form and filled out the Google Form specifying the email you want to use for invitations, you will receive invitations to create accounts on Slack and GitHub. Details about how you should complete these registrations are provided below.
Join the Slack workspace
Your Slack invitation will allow you to join the Slack workspace for the current semester of CDS 101 and CDS 102. Make sure to complete the registration as soon as possible, as Slack is the primary communication medium for this course and will completely replace email communications after the first week.
The following YouTube video explainer is an introduction to Slack and reviews the basics of how to use the application. Watch this video after you have completed your account registration.
::::: {.videos-container} ::: {.video-item} ::: :::::
Join the GitHub course organization
Your GitHub invitation will ask you to create a GitHub account and join the GitHub class organizations for CDS 101 and/or CDS 102. Step-by-step instructions on how to register for a GitHub account are available here: http://book.cds101.com/getting-started.html. If you didn’t click the link in the invitation email before creating your GitHub account, you will want to do so afterwards.
Setting up your RStudio Server account
::: {.callout .secondary} [Important!]{.h4}
This following steps can only be completed after you have joined the Slack workspace, as you will need the temporary password that the course instructor will send to you via Direct Message. :::
Navigate to RStudio Server https://rstudio.cos.gmu.edu using your web browser and login using your NetID and password. If this is the first time you are logging in, you will need to use the temporary password that was shared with you. If you cannot login, please post a message in the #r-rstudio-github-help Slack channel.
Change temporary password
The first thing you should do after logging in for the first time is change your temporary password. To do this, open up a terminal window by clicking [Tools → Shell…]{.monospace} in the top menu bar:
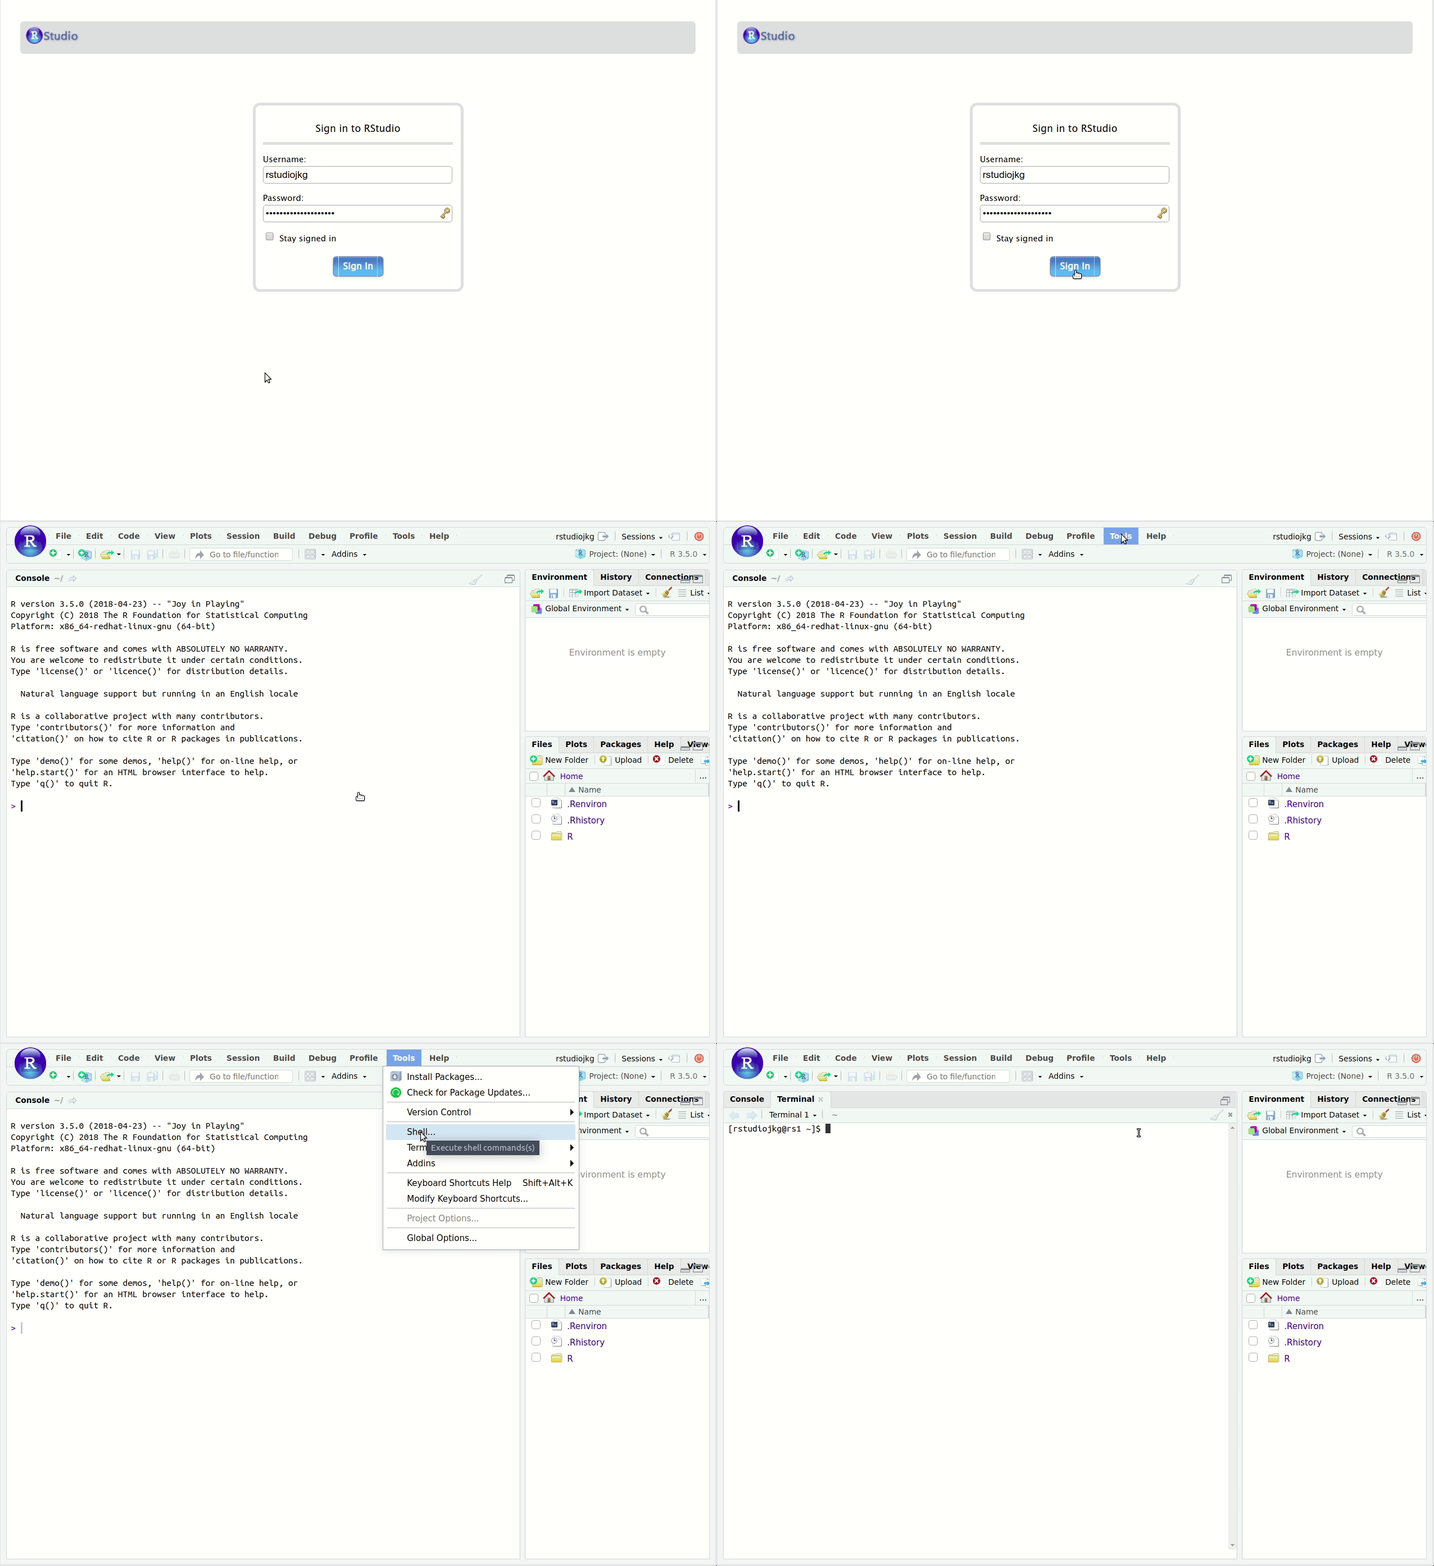
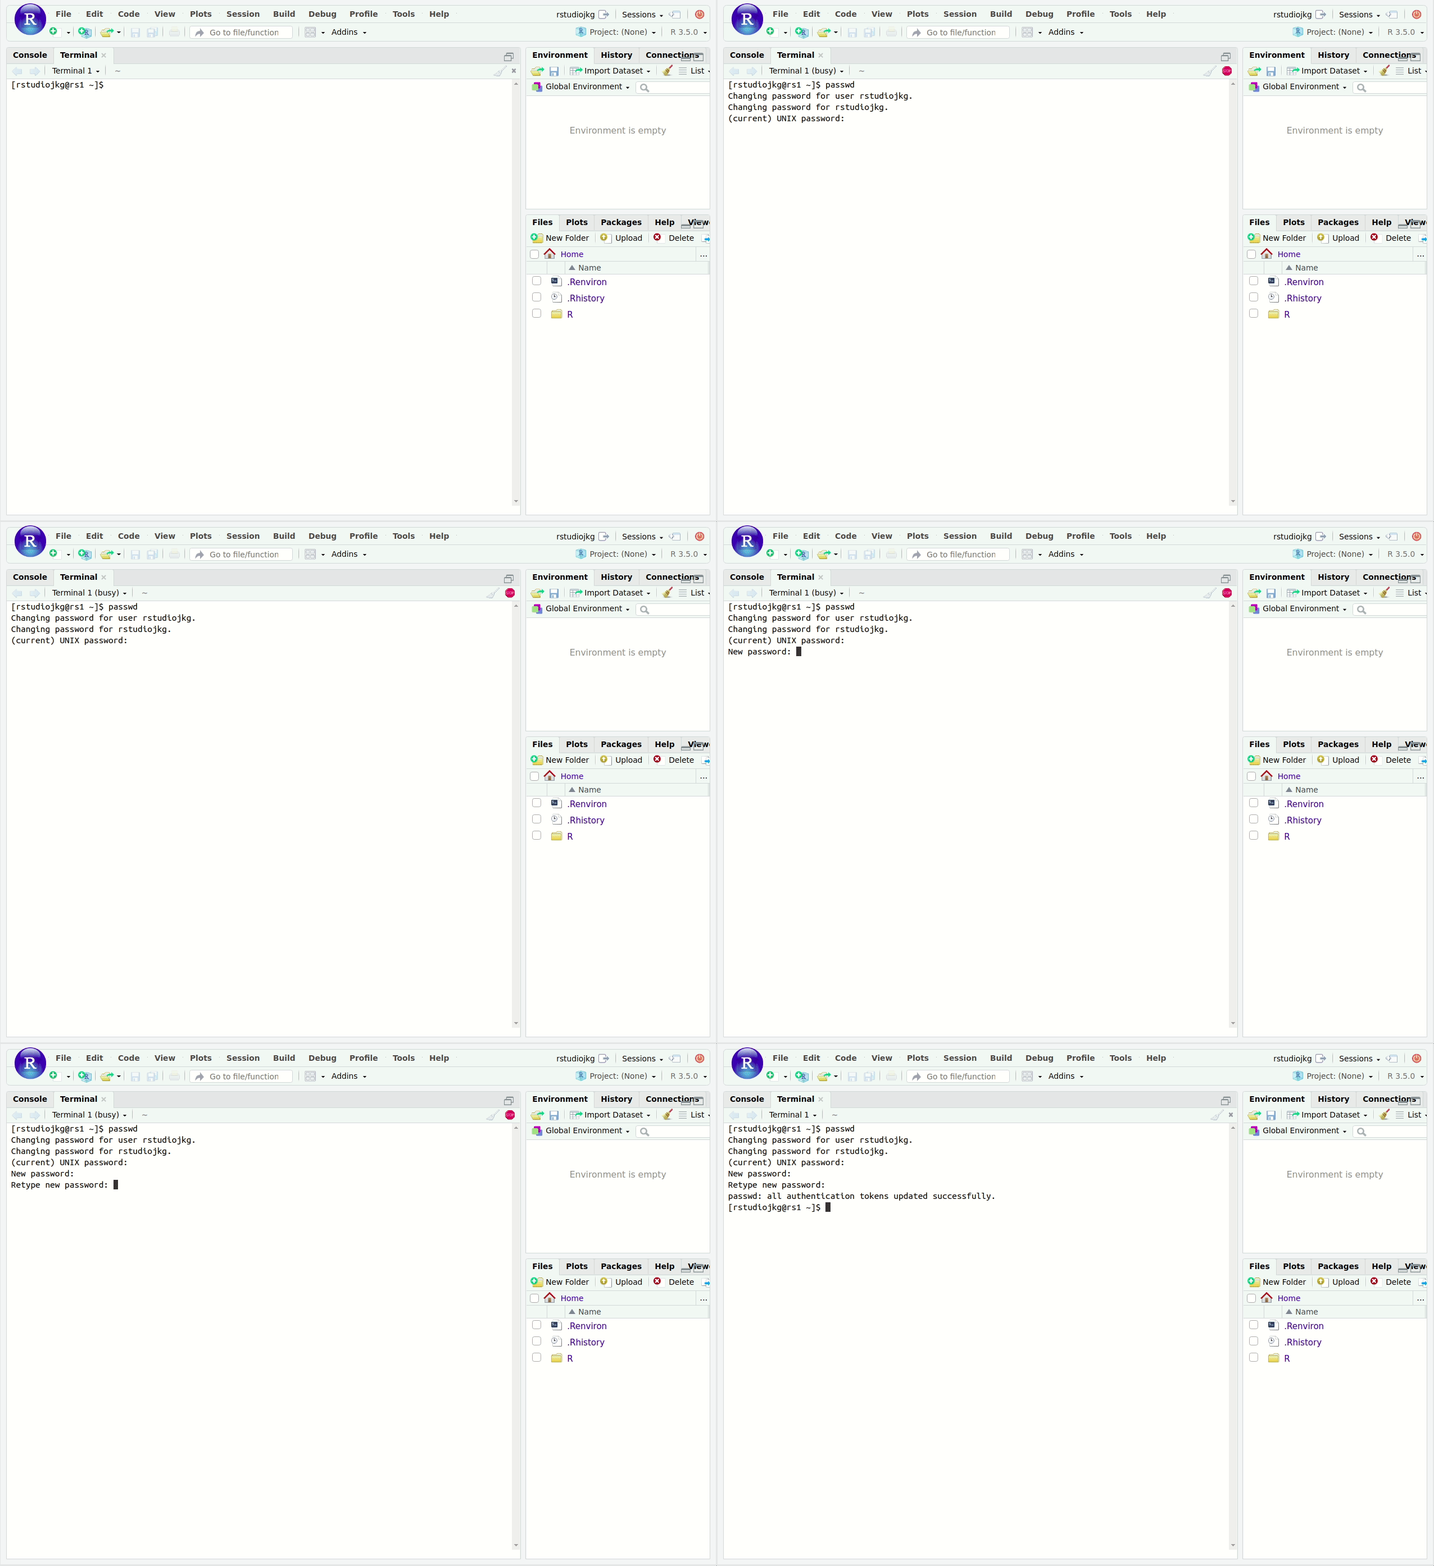
You should now see the command line. To change your password, enter the command:
passwd
You will then see the following message:
Changing password for user USERNAME.
Changing password for USERNAME.
(current) UNIX password:
Note that the word “USERNAME” in the above message is a placeholder, when you type it you will see your NetID. When you see this message, type in your password, followed by Enter. You will not see the cursor move when you type, this is okay and the expected behavior. If you entered your password correctly, you will then see:
New password:
Type in what you want your new password to be, then hit Enter. You’ll then see:
Retype new password:
Re-enter your password as directed, followed by Enter. If you didn’t make a mistake in typing your new password, you’ll then see:
passwd: all authentication tokens updated successfully.
If you don’t see this message, then there was a typo somewhere and your password was not changed, so you will need to type in passwd and try again.
Changing global options
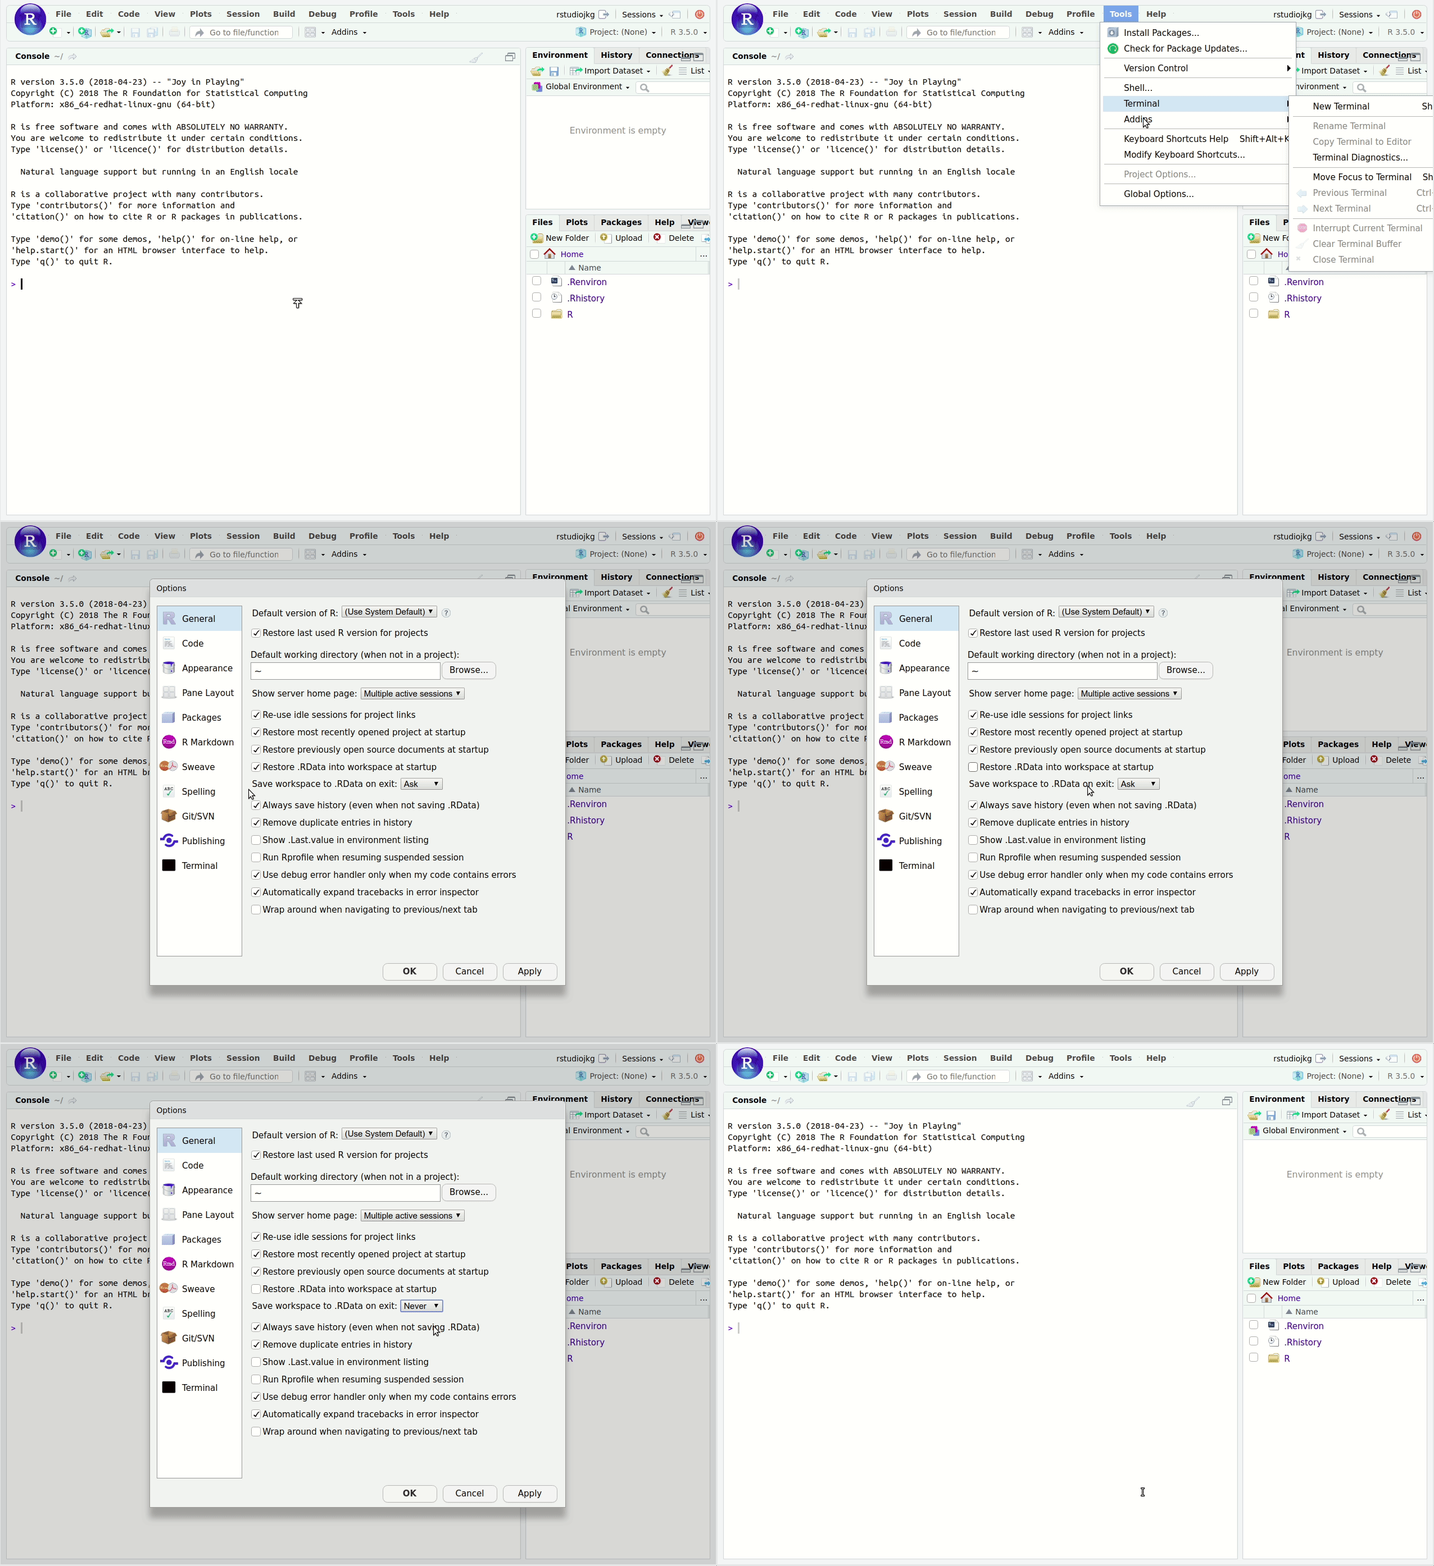
To change the settings for RStudio Server, click [Tools → Global Options…]{.monospace} in the top menu bar. A pop-up menu will appear with many different options for you to change. You are free to explore all the different options on your own. For now, there are two things you should change:
-
Uncheck the box next to Restore .RData into workspace at startup
-
Click the drop-down menu next to Save workspace to .RData on exit and change the setting to Never
Click the Apply button on the lower-right of the pop-up window, followed by the OK button.
Cloning the RStudio Server Initial Configuration repository
After you’ve changed your temporary password and disabled the [.RData]{.monospace} file, the next step is to clone this repository as a new project in RStudio Server. To do this, click on the New Project button, then Version Control, then Git, and then paste https://github.com/jkglasbrenner/rstudio-server-initial-configuration.git into the Repository URL box, and finally click Create Project.
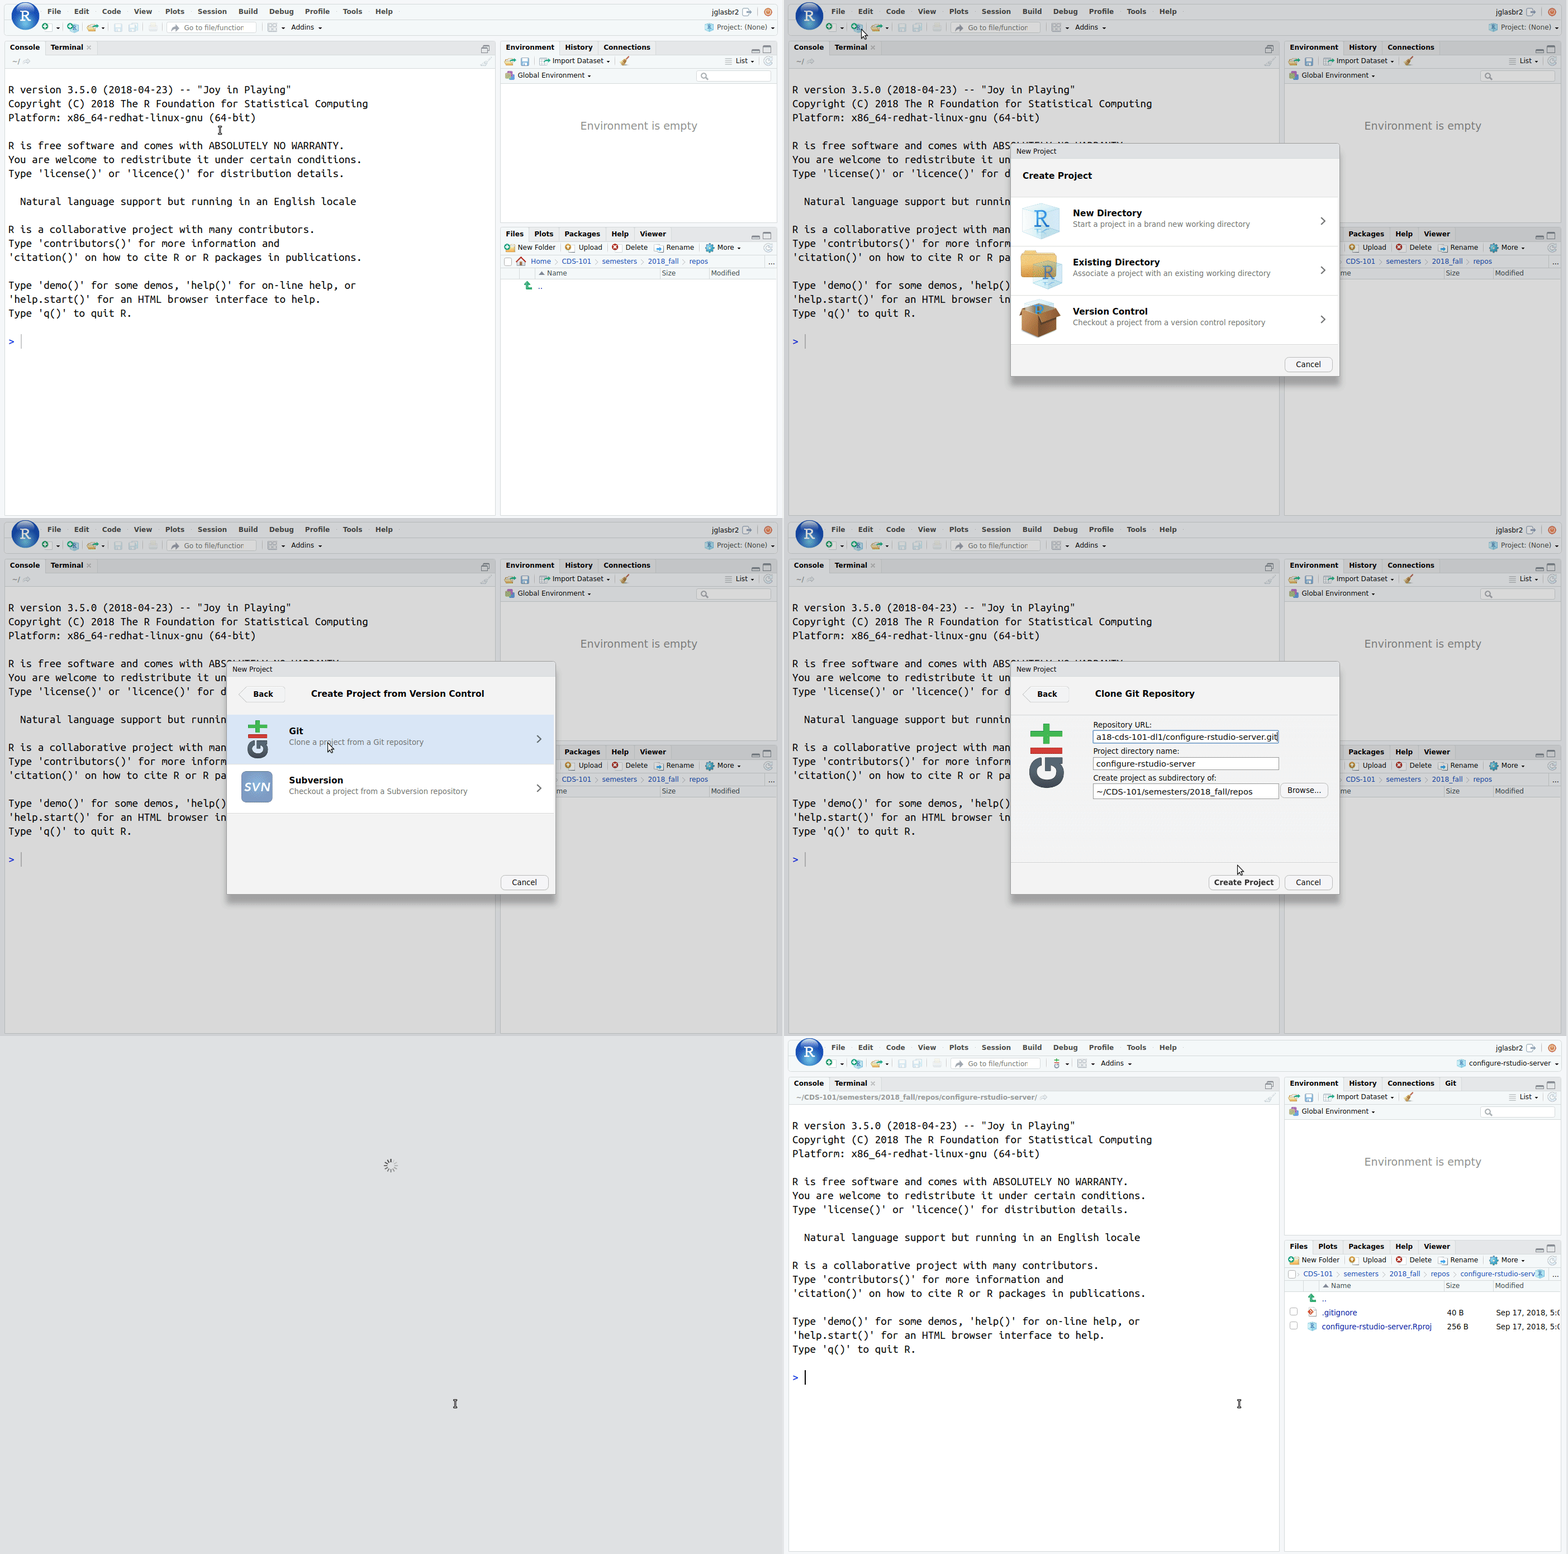
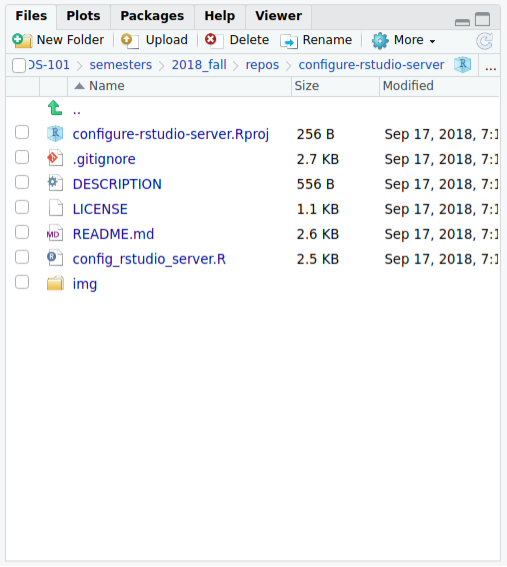
After the repository is cloned, you should see the following files in the file browser window in the lower right of RStudio Server.
Run the configuration script
Confirm that a file named [config_rstudio_server.R]{.monospace} is visible in that window, then type the following in the R Console window:
source("config_rstudio_server.R")
This will load helper functions into your R environment. Next, type the following in the R Console to begin the configuration procedure:
configure_rstudio()
When you run the above function, you will see input prompts asking for the following information:
Enter your first name:
Enter your last name:
Enter your email address:
Input your information and verify that it is correct, then wait for the configuration and installation procedure to complete, which will take a few minutes.
During installation, you might see the message:
These packages have more recent versions available.
Which would you like to update?
This is then followed by a numbered list of package names. If you see this, locate the number that has All to the right of it. For example, in the image below, that number is 22:
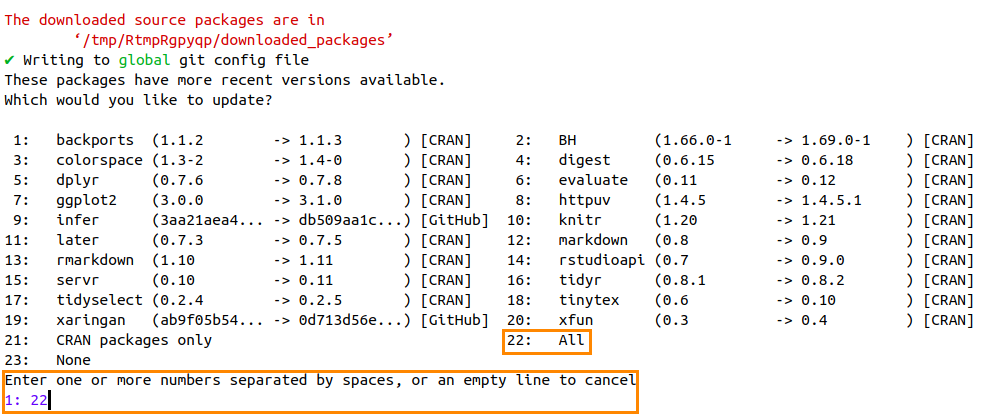
Type this number (in the example, we’d type 22), then press Enter. Note that your number may be different than what is shown. The installation procedure should resume.
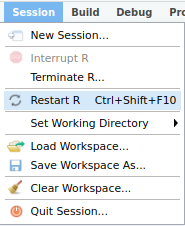
Once the installation procedure is complete, look for Session in the top menu bar, click it, and then click Restart R in the drop-down menu.
Save the current versions of your installed packages to a file
::: {.callout .secondary} [Important!]{.h4}
This step will only work correctly if you’ve clicked [Session → Restart R]{.monospace} as you were instructed to do at the end of the previous section. :::
To help you check that you’ve run the configure_rstudio() command correctly, our last step on RStudio Server will be to save the current versions of your installed packages to a file and submit it to Blackboard.
To do this, first you will need to type the following in the R Console window again to load the required helper functions:
source("config_rstudio_server.R")
After running this command, type the following in the R Console to save your package versions to a file:
export_package_versions()
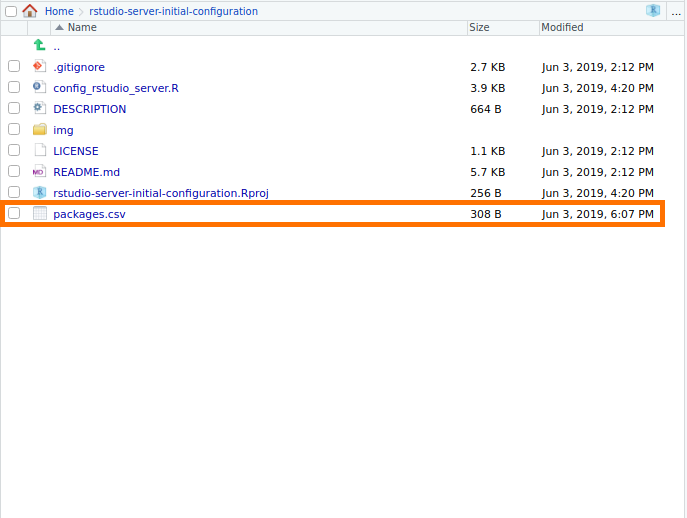
If this works correctly, you should see a new file named [packages.csv]{.monospace} appear in the file browser window on the lower right.
Submit [packages.csv]{.monospace} to Blackboard
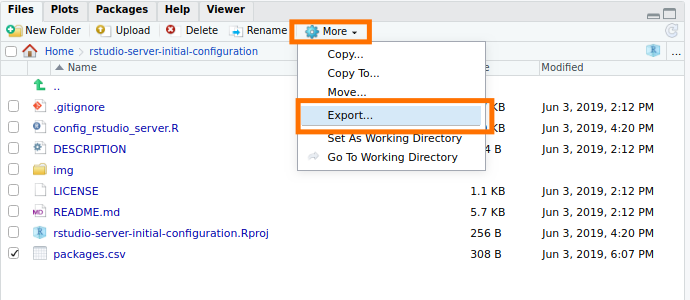
To submit your [packages.csv]{.monospace} file for validation, you will first need to download it to your computer. Check the box to the left of [packages.csv]{.monospace},

Click More followed by Export,
Click the Download button in the pop-up that appears,
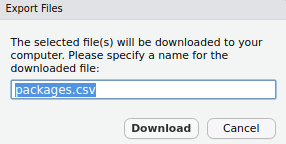
This will download the file to your computer, most likely to your [Download]{.monospace} folder. After you’ve downloaded the file to your computer, go to Blackboard and submit this file to the Lab 00: Beginnings assignment.
Create a Twitter account
One of the labs for CDS 102 involves gathering data from Twitter, which requires the use of a Twitter API token. The only way to get a Twitter API token is to have a Twitter developer account and obtaining one requires you to submit an application. Unfortunately this can lead to delays as each application is reviewed manually. Thankfully, Twitter provides a way for course instructors to grant students permission to generate Twitter API tokens when they will be used for the purposes of class assignments.
Do the following so that you are prepared for this upcoming lab:
-
Create a Twitter account if you do not have one already: https://twitter.com/signup
-
Submit your Twitter username to the appropriate assignment on Blackboard
Your Twitter username will be added to the team-based developer account for CDS 102, which will give you permission to generate Twitter API tokens. You will retain this permission until the end of the semester. Instructions on how to generate an API token will be provided in the lab that requires you to use it.
::: {.callout .primary} [Note]{.h4}
You do not need to use your personal Twitter account for this and the email address you use to create the account does not matter. If you want to create a temporary Twitter account just to use for this part of the course, that is completely fine. :::
Credits
This lab is licensed under a Creative Commons Attribution-NonCommercial-ShareAlike 4.0 International License. Exercises and instructions written by James Glasbrenner for CDS-102.

